Saturday, October 31, 2020

BREAKFAST WITH THE AUTHORS in Santa Barbara, Virtual Edition, Nov 14, 2020: Save the Date


TWO WEEKS FROM TODAY! 

I am looking forward to the 68th annual Breakfast With the Authors in Santa Barbara, Pajama Party Zoom Edition, to be held Saturday, November 14, 8:00-9:30, and 9:45-11:30. The first session will be for students and will consist of three writing/illustrating workshops. The second session, for librarians, teachers, and other adults, will include presentations by 18 authors, including myself.

To register for the event and receive the Zoom link, go to s.sbceo.org/breakfast2020 . The event is free for Santa Barbara County residents; a small fee is charged for those outside the county.

Friday, October 30, 2020

PUBLISHER'S WEEKLY Announcement of JULIET'S LIGHTHOUSE


The announcement of my book Juliet's Lighthouse, to be published in the spring of 2022 by Cameron Kids, appeared in this week's issue of Publisher's Weekly. I am excited about the book, which was inspired by a trip to Angel Island in San Francisco Bay, where I learned about Juliet Nichols, light keeper on the island at the time of the 1906 San Francisco earthquake, and her courageous ringing of the fog bell by hand during two long foggy nights after the mechanism of the bell machine failed. The book will be illustrated by Rachell Sumpter.

Wednesday, October 28, 2020

PHOTO TIP #4 for Illustrating Your Next Book: DIFFERENT SETTINGS, ANGLES and ACTIVITIES


For many years I worked with professional photographers who illustrated my books with their photos. We worked as a team--I wrote the text and the photographer took the pictures. I learned a great deal about photography from them. Recently, I have been both author and photographer for several of my books, including Hatching Chicks in Room 6 and Butterflies in Room 6.
As I was cleaning out files recently I found a list of photo tips from my friend and fellow Grinnellian, Martha Cooper, a professional photographer and illustrator of three children's books, My Two Worlds, Lion Dancer and Anthony Reynoso: Born to Rope. At a class we taught together some years ago she handed out a list of photo tips. 

Today, almost everyone is a photographer--we carry cameras in our pockets in our phones. Whether you are illustrating a children's book, creating a magazine story, or assembling a slide show or family album, or even just sharing a favorite photo with a friend, I think you will find her advice useful. She says:

LOOK and THINK before you shoot. A good eye is more important than a good camera.

Tip #4: Try different settings, angles and activities. Move your subject around or move around your subject. Shoot wide, medium, and close-up shots as well as horizontals and verticals of the same shot so that you (or the editor) will have choices for a layout. 

Example: During the years I worked with Richard Hewett, my role was both writer and photographer's assistant. I helped carry equipment, spot photo opportunities, and sometimes posed as model to give human scale to the picture. For the photo that we used for the cover of our book, The Ancient Cliff Dwellers of Mesa Verde, I agreed to climb a ladder in one of the cliff dwellings so viewers could see the relative size of the structures. In another photo, a close-up of my hand holding pottery fragments gives the reader a sense of the relative size of the pieces. The Ancient Cliff Dwellers of Mesa Verde is available as an ebook on Amazon.

Photo by Richard Hewett


Wednesday, October 21, 2020

PHOTO TIP #3 for Illustrating Your Next Book: TELLING A STORY


For many years I worked with professional photographers who illustrated my books with their photos. We worked as a team--I wrote the text and the photographer took the pictures. I learned a great deal about photography from them. Recently, I have been both author and photographer for several of my books, including Hatching Chicks in Room 6 and Butterflies in Room 6.
As I was cleaning out files recently I found a list of photo tips from my friend and fellow Grinnellian, Martha Cooper, a professional photographer and illustrator of three children's books, My Two Worlds, Lion Dancer and Anthony Reynoso: Born to Rope. At a class we taught together some years ago she handed out a list of photo tips. Today, almost everyone is a photographer--we carry cameras in our pockets in our phones. Whether you are illustrating a children's book, creating a magazine story, or assembling a slide show or family album, or even just sharing a favorite photo with a friend, I think you will find her advice useful.

LOOK and THINK before you shoot. A good eye is more important than a good camera.


Tip #3: Your photos will probably tell some kind of story. Even if there is no inherent chronological order, you will need strong opening and closing shots and logically sequenced photos in between.  (Martha Cooper)

All of the books in the zoo animal series published by Morrow Junior Books are life cycle books--beginning with the birth of a young animal and concluding with the animal's independence. The logical sequence of the photos was the real time development of the story. I worked with photographer Richard Hewett on these books.

Pages 4-5, Penguin, photos by Richard Hewett

In Penguin, the story of Magellanic penguins at the San Francisco Zoo, we began with the parents building a nest. The story then proceeded to show the egg, baby chick, and the young chicks ready to be on their own. The final photo looks to the future and shows an adult penguin, bringing the story full circle.

Page 45, Penguin, photo by Richard Hewett

Penguin
is no longer available as a print book, but you can find it online as an ebook.

Saturday, October 17, 2020

LETTERS FROM STUDENTS


I always love receiving letters from students, especially in response to an author visit. Last February I visited third and fourth grade students in Elizabeth Williams’ class at Esperanza School near downtown Los Angeles. I recently received the letters they had begun after my visit, but didn’t finish because school was closed for the pandemic. I’d like to share a few of their comments. It is always so gratifying to find out how much the students learn from my visit. I hope that it won’t be too long before children are back in school and it will be possible to do author visits again.

“Thank you so much for coming to tell us a little bit about you. Something that I liked about you is that even when you were a little girl you liked to write.”

“You taught us lots of stuff that we didn’t know about. You showed us how big a California Condor’s wingspan is.”

“One day I want to be like you. I am an artistic kid. You inspired me so much. Thanks for the inspiration!”

“You showed me a lot of facts and surprised me with how many books you made.”

“I liked the book that you wrote All About Birds.”

“When I grow up I may want to be like you.”

“Thank you for coming. You took some time out of your schedule to come here. Not everyone is like you. Some people are too busy to visit us.”

“Thank you for telling us about global warming.”

“We are delighted and hopefully you can come again another time.”

Wednesday, October 14, 2020

PHOTO TIP #2 for Illustrating Your Next Book: Double Page Spreads

For many years I worked with professional photographers who illustrated my books with their photos. We worked as a team--I wrote the text and the photographer took the pictures. I learned a great deal about photography from them. I have been both author and photographer for several of my newest books, including Hatching Chicks in Room 6 and Butterflies in Room 6. The first book for which I was both author and photographer was Easter Island (Clarion, 2000)

As I was cleaning out files recently I found a list of photo tips from my friend and fellow Grinnellian, Martha Cooper, a professional photographer and illustrator of three children's books, My Two Worlds, Lion Dancer and Anthony Reynoso: Born to Rope. At a class we taught together some years ago she handed out a list of photo tips. Today, almost everyone is a photographer--we carry cameras in our pockets in our phones. Whether you are illustrating a children's book, creating a magazine story, or assembling a slide show or family album, or even just sharing a favorite photo with a friend, I think you will find her advice useful.

LOOK and THINK before you shoot. A good eye is more important than a good camera.
Tip #2: Keep space restraints in mind. Sometimes a single photo is enough to tell a whole story. If your photos are likely to be used small, keep your compositions simple. If there is a chance of a double page spread, be sure to shoot some horizontals. (Martha Cooper)

 
Example: When I visited Easter Island, I purposely shot the picture of Ahu Tongariki, the row of stone figures at one of the historical sites, as a horizontal leaving plenty of room in the sky for text, anticipating that it would work well for the copyright and table of contents at the beginning of the book. (Easter Island is out of print but available as an e-book at Amazon.)


Saturday, October 10, 2020

LITLINKS GUEST POST: Kids See Chicks Hatch With Their Own Eyes

This article first appeared on September 16, 2020, as a guest post at Patricia Newman's blog, LitLinks, Authors, Educators, Scientists sharing the natural connections between STEM and Language Arts. 


Life Cycle Reinforces Reading:

In 21 days, chicks will hatch in Room 6! A hen laid the eggs, and Mrs. Best brought them to school and put them in an incubator. Soon the chicks will PECK, PUSH, and POP right out of their shells. The kindergarteners are counting down to hatching day. When it happens, they’ll be ready.
Among the many lessons learned in HATCHING CHICKS IN ROOM 6 is the life cycle process–from incubating the eggs, seeing the shells break open, to watching the chicks grow from fluffy balls to fully feathered chickens. It is one thing to be told that chicks grow in eggs, but another to actually see an egg hatch with your own eyes. This photo essay follows an egg from the time it is laid in the henhouse, through the incubating and hatching process in a school classroom, to the time when the chicks are ready to go back to the flock. Children observe the eggs and chicks up close as they learn firsthand about a chicken’s life cycle.

Strategies for reading Hatching Chicks in Room 6:


Main text: The text of HATCHING CHICKS IN ROOM 6 is written on two levels—the main narrative, printed in larger type, and sidebars, printed in smaller type. Headings are red and in capital letters for emphasis. What is the effect of telling the story in the present tense? Does it make you feel as if you are participating in the process?
Sidebars and captions: The sidebars and captions add information, provide the opportunity to introduce more difficult vocabulary, and expand on material in the main text. Note that the sidebars are printed over a photo of an egg, reinforcing the theme of the book.
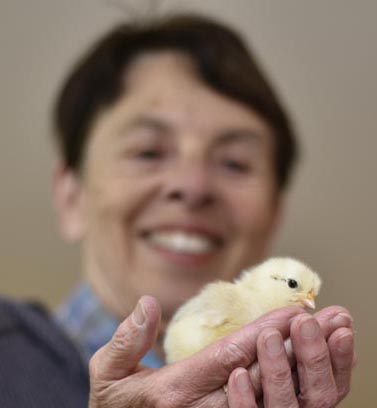
Photos: “Reading” the photos is an important part of understanding the book. Photos:
  • Add information to the story (such as showing what an incubator looks like),
  • Show the children in their environment (in the classroom and outside in the chicken pen),
  • Provide a sense of scale (we see the size of a newly hatched chick as it rests in a child’s hand), and
  • Enlarge details for a closer look (the parts of a chick’s body).
  • The photos also reveal the children’s emotional response to the chicks. We see and share their sense of wonder as they participate in each step of the process.
Back matter:  Back matter includes answers to questions about eggs and chicks, vocabulary, links to online information about hatching chicks, and a list of books for further reading.

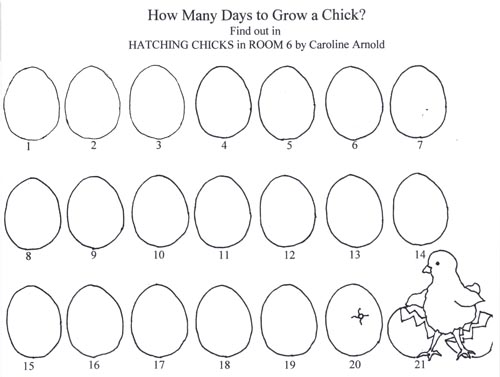
Hands-on: How many days to hatch a chick?

The events of the story in HATCHING CHICKS IN ROOM 6 occur in chronological order. You can use these events to create a time line, beginning with the day the eggs go into the incubator.  Click HERE for a downloadable coloring page.

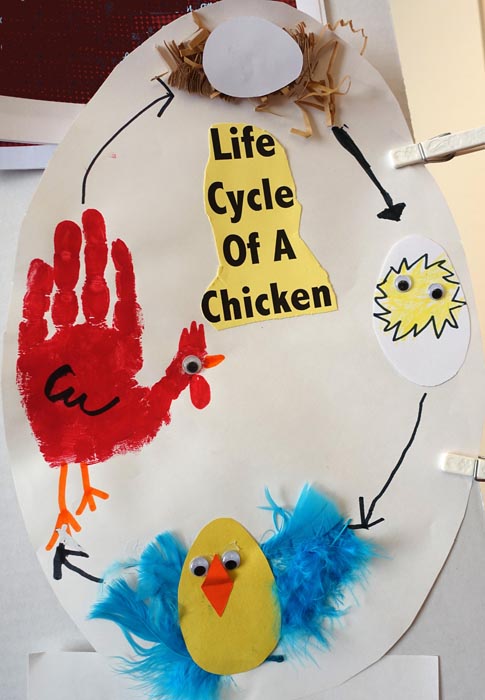
Which came first, the chicken or the egg?

In one classroom of second graders, the children made a mixed media presentation to show the life cycle of a chicken. They used packing material to represent the chicken’s nest, real feathers to represent the growing chick, a hand-print for the body of an adult chicken, markers for drawing, and googly eyes for all. Mounted on a large poster board cut into an egg shape, with black arrows drawn to indicate the circular process, it is a dramatic and colorful presentation.
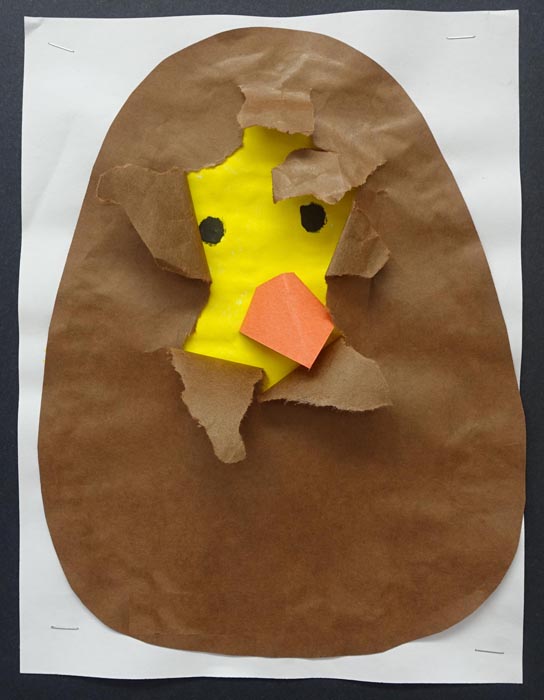
Ready to hatch!

When a chick is ready to hatch, it uses its beak to poke a hole in the shell.
For this project you will need: Construction paper, pencil, scissors, glue, black marker.
1. Cut out two large egg shapes from yellow and brown paper. Cut a small hole in the middle of the brown paper. Glue the egg shapes together around the edges.
2. Carefully tear back the hole in the brown paper, pulling the pieces to reveal the yellow paper underneath.
3. Use a marker to draw two black eyes. Cut a triangle of orange paper and fold in half to make a beak. Glue it on.
Now your chick looks like it is ready to hatch!

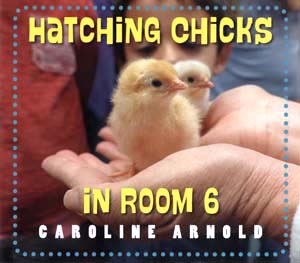
Caroline Arnold has been writing since 1980 and is the author of 170 books for children, including  Butterflies in Room 6 (2019) and companion book Hatching Chicks in Room 6 (2017), a JLG Premier Selection and CRA Eureka Award winner. She illustrated both books with her own color photos. Other recent titles include A Day and Night in the Rain Forest in her Habitats series, illustrated with her own cut paper art. A noted science writer, Caroline Arnold has had thirty-three books on the NSTA Outstanding Science Trade Books list including Too Hot? Too Cold? and  A Warmer World. Her books are inspired by her travels, her love of animals, fossils, and the out-of-doors. She lives in Los Angeles, California. www.carolinearnold.com

Wednesday, October 7, 2020

SCBWI BOOKSTOP, FALL 2020: Trapped in Tar

Please check out my webpage featuring TRAPPED IN TAR: FOSSILS FROM THE ICE AGE at the SCBWI Bookstop, Fall 2020 page. The "Buy the Book" feature takes you directly to Amazon where you can order either a paperback copy or the digital edition.

BookStop, a super compendium of books published by SCBWI members 2018-2020, will be online from October 6 to November .